PMX to VRM Guide: Convert MMD Models into Desktop VRM Characters
You found a PMX/MMD model you love, but the app you want to use needs a `.vrm`. This guide walks through the complete PMX to VRM workflow with Blender and the VRM Add-on: Humanoid bone mapping, expressions, MToon materials, Spring Bone physics, metadata, and finally importing the converted character into AniMate on Windows.
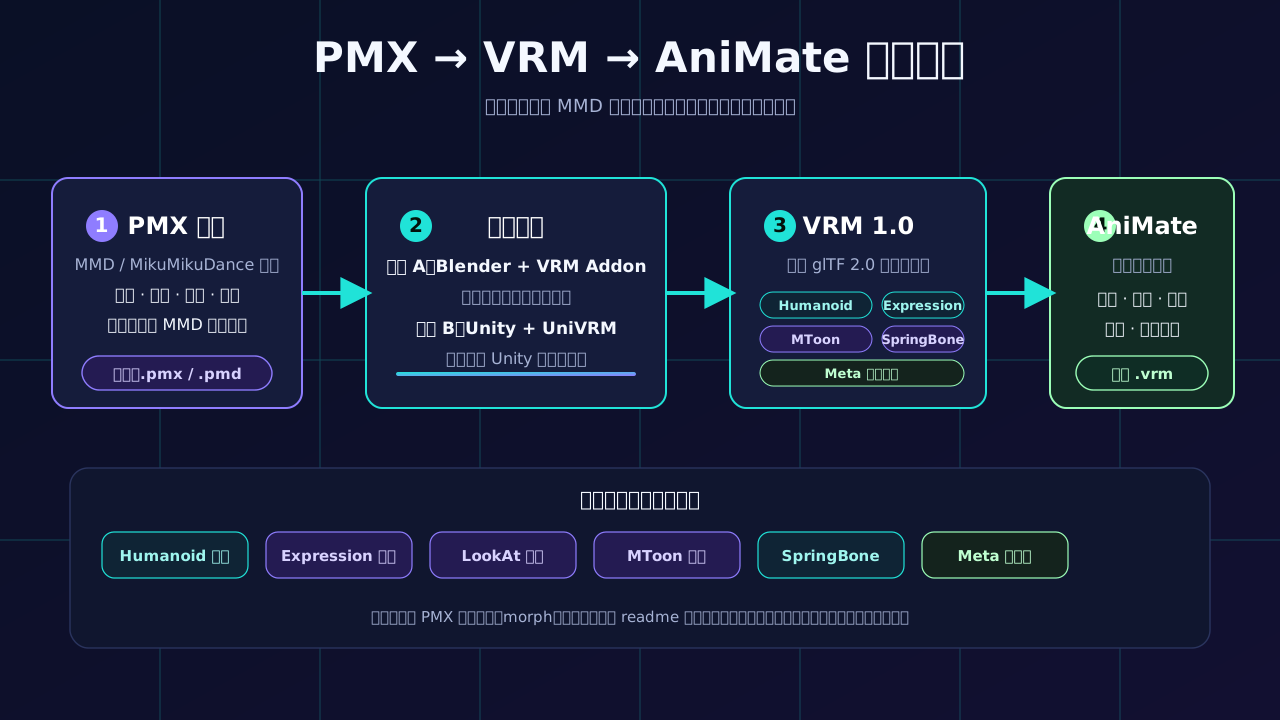
Why convert PMX to VRM?
PMX is the standard model format of the MMD (MikuMikuDance) ecosystem. It contains bones, morphs, materials, and physics tuned for MMD animation, which makes it excellent for dance videos but awkward for everything else. Most modern character platforms want an interoperable avatar file instead.
VRM is an open 3D format designed for virtual characters. It is widely supported by VTuber tools, VRChat-style social platforms, and desktop companion apps such as AniMate. After conversion, the same model can be used in many places:
- As an interactive desktop companion that blinks, reacts to the mouse, idles, dances, and stays beside your apps.
- With VTuber production tools such as VTube Studio and Warudo.
- In VR social platforms and avatar-sharing communities.
- Across different apps and future tools that speak the VRM standard.
In short: PMX belongs to the MMD pipeline, while VRM is built to travel.
PMX to VRM conversion routes
| Route | Tools | Best for | Difficulty | Recommendation |
|---|---|---|---|---|
| Route A: Blender | Blender + VRM Add-on + MMD Tools | New converters and users who prefer a visual panel workflow | Beginner-friendly | Recommended |
| Route B: Unity | Unity + MMD4Mecanim + UniVRM | Users who already know Unity and need fine-grained collider work | Intermediate | Use when needed |
VRM technical foundations: know what you are converting
Before opening Blender, take a few minutes to understand the pieces inside a VRM file. Most conversion problems come from mapping PMX concepts into the wrong VRM subsystem.
VRM is glTF 2.0 plus extensions
VRM is not a format invented from scratch. It is built on glTF 2.0, the Khronos Group standard for transmitting 3D assets. A VRM file is effectively a `.glb` binary file that uses the `.vrm` extension and declares VRM-specific data in glTF's extension fields:
extensionsUsed: [
  "VRMC_vrm",              // VRM core
  "VRMC_materials_mtoon",  // anime/cel material
  "VRMC_springBone",       // spring bone physics
  "VRMC_node_constraint",  // node constraints
  "KHR_materials_unlit",   // unlit helper
  "KHR_texture_transform", // texture transform helper
]
Any renderer that supports glTF 2.0 can load a VRM once it implements these extensions. That shared foundation is why the format works across desktop apps, VTuber software, and social platforms.
The five core VRM subsystems
| Subsystem | Field | Purpose | Required |
|---|---|---|---|
| Humanoid | humanoid | Maps glTF nodes to a standardized human skeleton | Yes |
| Meta | meta | Model name, author, version, and license | Yes |
| FirstPerson | firstPerson | Head mesh visibility rules for VR first-person view | Optional |
| Expressions | expressions | Facial expression system called BlendShape in VRM 0.x | Optional |
| LookAt | lookAt | Eye tracking toward a target | Optional |
VRM update order: why sequence matters
The VRM specification defines a strict evaluation order for its subsystems each frame. If expressions fight with blinking, or spring bones shake for no obvious reason, the fix is usually related to this order:
1. Humanoid bone solve
   |  (head position known)
2. LookAt solve
   |  (Bone rotates eyes / Expression sets weights)
3. Expression updates
   |  (external input -> LipSync -> AutoBlink -> LookAt expressions)
4. Expression application
   |  (all expression weights accumulate, then apply)
5. Constraints solve
   |  (rotation constraints, IK constraints, etc.)
6. Spring Bone solveVRM 0.x vs VRM 1.0
| Area | VRM 0.x | VRM 1.0 |
|---|---|---|
| Expression naming | BlendShape | Expression |
| Expression weights | 0-100 | 0-1 |
| Emotion names | joy, sorrow, fun | happy, sad, relaxed |
| Surprise expression | None | surprised |
| Expression bindings | Mostly MorphTarget | MorphTargetBind + MaterialColorBind + TextureTransformBind |
| Conflict handling | Not specified | Override system with block / blend modes |
| Extension prefix | Inconsistent | VRMC_ |
| chest bone | Required | Optional |
| neck bone | Required | Optional |
Official references
| Resource | Address | Use |
|---|---|---|
| VRM official site | vrm.dev | Format overview, tools, and case studies |
| VRM specification repo | github.com/vrm-c/vrm-specification | Full technical spec with JSON schemas and docs |
| UniVRM | github.com/vrm-c/UniVRM | Unity import/export implementation |
| VRM Add-on for Blender | github.com/saturday06/VRM-Addon-for-Blender | Blender import/export add-on |
Route A: Blender + VRM Add-on
Step 1: Install the tools
| Tool | Version | Download |
|---|---|---|
| Blender | 3.6+, ideally 4.2+ | blender.org |
| VRM Add-on for Blender | Latest | GitHub |
| MMD Tools | Latest | Install from the Blender add-on manager |
| CATS Blender Plugin | Optional | Search GitHub or Blender extensions |
Install the VRM Add-on
- Open Blender and go to Edit → Preferences.
- Open the Add-ons tab and click Install... in the top-right.
- Choose the downloaded VRM Add-on `.zip` and click Install Add-on.
- Find VRM in the list and enable it.
Install MMD Tools for PMX import
- In Preferences → Add-ons → Install, select the MMD Tools `.zip`.
- Install and enable the add-on.
- Blender's File → Import menu will now show
MikuMikuDance Model (.pmx/.pmd).
Step 2: Import the PMX model
- Run File → Import → MikuMikuDance Model (.pmx/.pmd).
- Select your `.pmx` file in the file browser.
- Check the result: all meshes should be present, textures should load, and the armature should contain the expected bones.
Step 3: Map MMD bones to VRM Humanoid
PMX and VRM use different skeleton systems. VRM requires a standardized Humanoid skeleton, so this step maps the PMX armature onto VRM bone names. This is the most important part of the conversion because missing required bones will block export and cause animation errors later.
- Select the model's Armature.
- Open the VRM tab in the right-side properties panel.
- Click Create VRM Model and let the add-on attempt an automatic mapping.
- Open the Humanoid section and inspect the result.
MMD bone mapping reference
The following tables list common MMD bone names and their VRM Humanoid equivalents. Bold entries are required in VRM 1.0; other entries are optional but recommended for good animation.
Torso and head
| MMD bone name (Japanese) | Body part | VRM bone | Required in VRM 1.0? |
|---|---|---|---|
| 全ての親 | Root / hips reference | Hips | Yes |
| 上半身 | Upper body | Spine | Yes |
| 上半身2 | Chest | Chest | No |
| 上半身3 | Upper chest | UpperChest | No |
| 首 | Neck | Neck | No |
| 頭 | Head | Head | Yes |
| 左目 / 右目 | Left / right eye | LeftEye / RightEye | No |
| あご | Jaw | Jaw | No |
Legs
| MMD bone name (Japanese) | Body part | VRM bone | Required in VRM 1.0? |
|---|---|---|---|
| 左足 | Left upper leg | LeftUpperLeg | Yes |
| 左ひざ | Left lower leg | LeftLowerLeg | Yes |
| 左足首 | Left foot | LeftFoot | Yes |
| 左つま先 | Left toes | LeftToes | No |
| 右足 | Right upper leg | RightUpperLeg | Yes |
| 右ひざ | Right lower leg | RightLowerLeg | Yes |
| 右足首 | Right foot | RightFoot | Yes |
| 右つま先 | Right toes | RightToes | No |
Arms
| MMD bone name (Japanese) | Body part | VRM bone | Required in VRM 1.0? |
|---|---|---|---|
| 左肩 | Left shoulder | LeftShoulder | No |
| 左腕 | Left upper arm | LeftUpperArm | Yes |
| 左ひじ | Left lower arm | LeftLowerArm | Yes |
| 左手首 | Left hand | LeftHand | Yes |
| 右肩 | Right shoulder | RightShoulder | No |
| 右腕 | Right upper arm | RightUpperArm | Yes |
| 右ひじ | Right lower arm | RightLowerArm | Yes |
| 右手首 | Right hand | RightHand | Yes |
Fingers: optional but worth mapping
MMD finger bones are usually named 指0 through 指3. VRM 1.0 defines a complete finger skeleton. Fingers are not required for basic desktop use, but grabbing, pointing, and hand gestures rely on them.
| VRM finger bone | Note |
|---|---|
| LeftThumbMetacarpal | Thumb metacarpal |
| LeftThumbProximal | Thumb proximal phalanx |
| LeftThumbDistal | Thumb distal phalanx |
| LeftIndexProximal -> Distal | Index finger chain |
| LeftMiddleProximal -> Distal | Middle finger chain |
| LeftRingProximal -> Distal | Ring finger chain |
| LeftLittleProximal -> Distal | Little finger chain |
The right hand follows the same pattern: replace Left with Right.
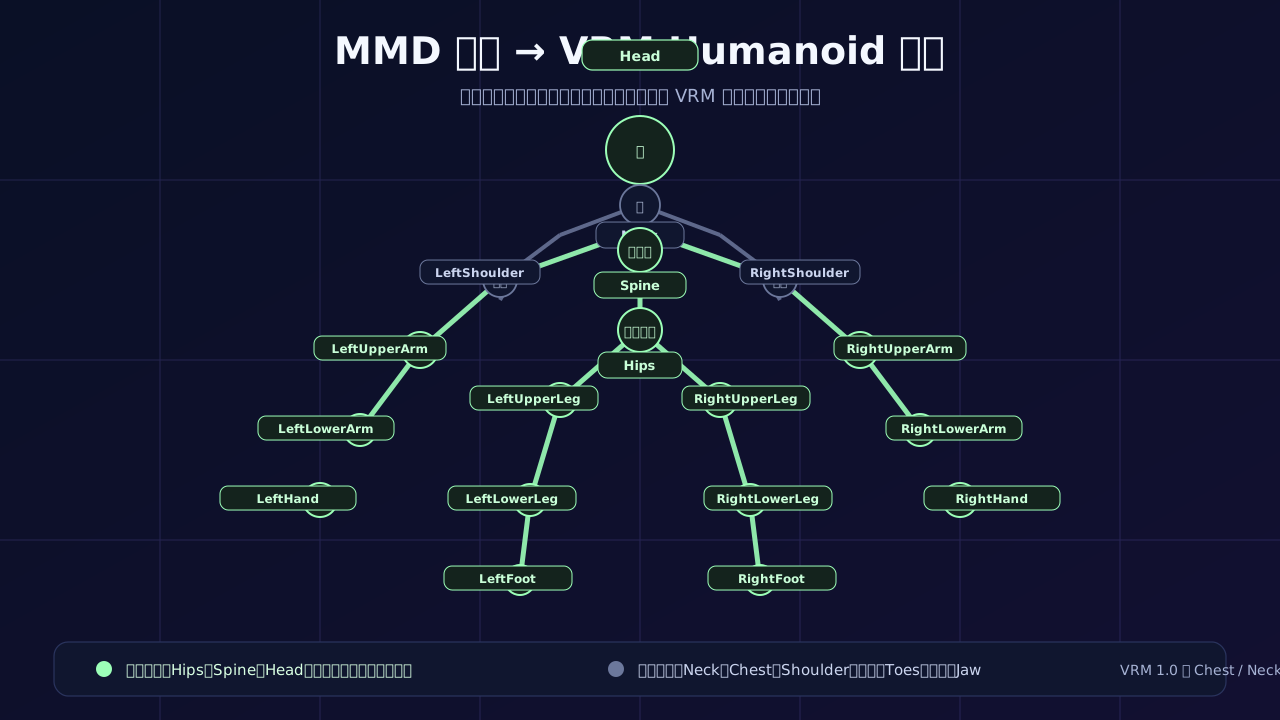
VRM 1.0 Humanoid hierarchy
Each Humanoid bone has a fixed parent relationship. If an intermediate bone is missing, the hierarchy climbs to a grandparent. This tree is the map you need when debugging mapping failures:
root (non-Humanoid node, origin)
+-- hips
    |-- spine
    |   +-- (chest)
    |       +-- (upperChest)
    |           |-- (neck)
    |           |   +-- head
    |           |       |-- (leftEye)
    |           |       |-- (rightEye)
    |           |       +-- (jaw)
    |           |-- (leftShoulder)
    |           |   +-- leftUpperArm
    |           |       +-- leftLowerArm
    |           |           +-- leftHand
    |           +-- (rightShoulder)
    |               +-- rightUpperArm
    |                   +-- rightLowerArm
    |                       +-- rightHand
    |-- leftUpperLeg
    |   +-- leftLowerLeg
    |       +-- leftFoot
    |           +-- (leftToes)
    +-- rightUpperLeg
        +-- rightLowerLeg
            +-- rightFoot
+-- (rightToes)hips moves; other Humanoid bones rotate. Non-Humanoid intermediate nodes are allowed between Humanoid bones, and positive bone scale values are required.If automatic mapping fails
- Run the add-on's Auto Map command again after selecting the armature.
- Assign missing bones manually in the Humanoid panel.
- Check that the PMX uses standard MMD bone names; Japanese names must match correctly.
Step 4: Set up expressions
A VRM character needs standard expressions before a desktop companion can make it blink, talk, or show emotion. VRM 0.x calls this system BlendShape; VRM 1.0 calls it Expression. The concept is the same, but VRM 1.0 is more capable.
Emotion expressions
| VRM 1.0 name | VRM 0.x name | Common MMD morph | Meaning |
|---|---|---|---|
happy | joy | 笑い | Smile / happy |
angry | angry | 怒り | Angry |
sad | sorrow | 困る | Sad |
relaxed | fun | にっこり | Relaxed |
surprised | Not in 0.x | びっくり | Surprised (VRM 1.0) |
Lip sync
| VRM 1.0 name | VRM 0.x name | Common MMD morph | Vowel |
|---|---|---|---|
aa | a | あ | a |
ih | i | い | i |
ou | u | う | u |
ee | e | え | e |
oh | o | お | o |
Blink
| VRM 1.0 name | VRM 0.x name | Common MMD morph | Meaning |
|---|---|---|---|
blink | blink | まばたき | Both eyes blink |
blinkLeft | — | 左まばたき | Left eye only (1.0) |
blinkRight | — | 右まばたき | Right eye only (1.0) |
Look expressions
| VRM 1.0 name | Meaning |
|---|---|
lookUp | Look up |
lookDown | Look down |
lookLeft | Look left |
lookRight | Look right |
leftEye / rightEye, while Expression drives the four look expressions through vertices or texture offsets. Most MMD models use the Expression mode because their eyes are texture-based.How to set expressions in Blender
- In the VRM panel, open BlendShape Master (VRM 0.x) or Expressions (VRM 1.0).
- Add one expression group at a time and map each MMD morph to its standard VRM expression.
VRM 1.0 expression binding types
| Binding type | Effect | Typical use |
|---|---|---|
| MorphTargetBind | Drives a mesh MorphTarget | Blink, open mouth, smile, and other vertex deformations |
| MaterialColorBind | Changes material color | Blush, pupil color change |
| TextureTransformBind | Offsets or scales texture UVs | Eye texture rolling for look direction |
In VRM 1.0, one expression can combine multiple bindings. For example, a blush expression can contain a MorphTarget for slightly puffed cheeks plus a MaterialColorBind that turns the cheek material red.
Expression Override in VRM 1.0
When an app triggers several expressions at once, such as talking while auto-blink is active, the face can clip. The Override system gives you three strategies:
| Override mode | Behavior | Use |
|---|---|---|
none | No intervention | Default |
block | Forces the targeted program expression to zero when this expression is active | Hard cutoff, such as blocking blink while happy |
blend | Fades the targeted expression as this expression goes from 0 to 1 | Smooth transitions, recommended |
Each expression can set overrideMouth, overrideBlink, and overrideLookAt.
overrideBlink = "blend" and overrideMouth = "blend" on happy, angry, and sad. This prevents eyelids from cutting through the face when the character smiles while blinking.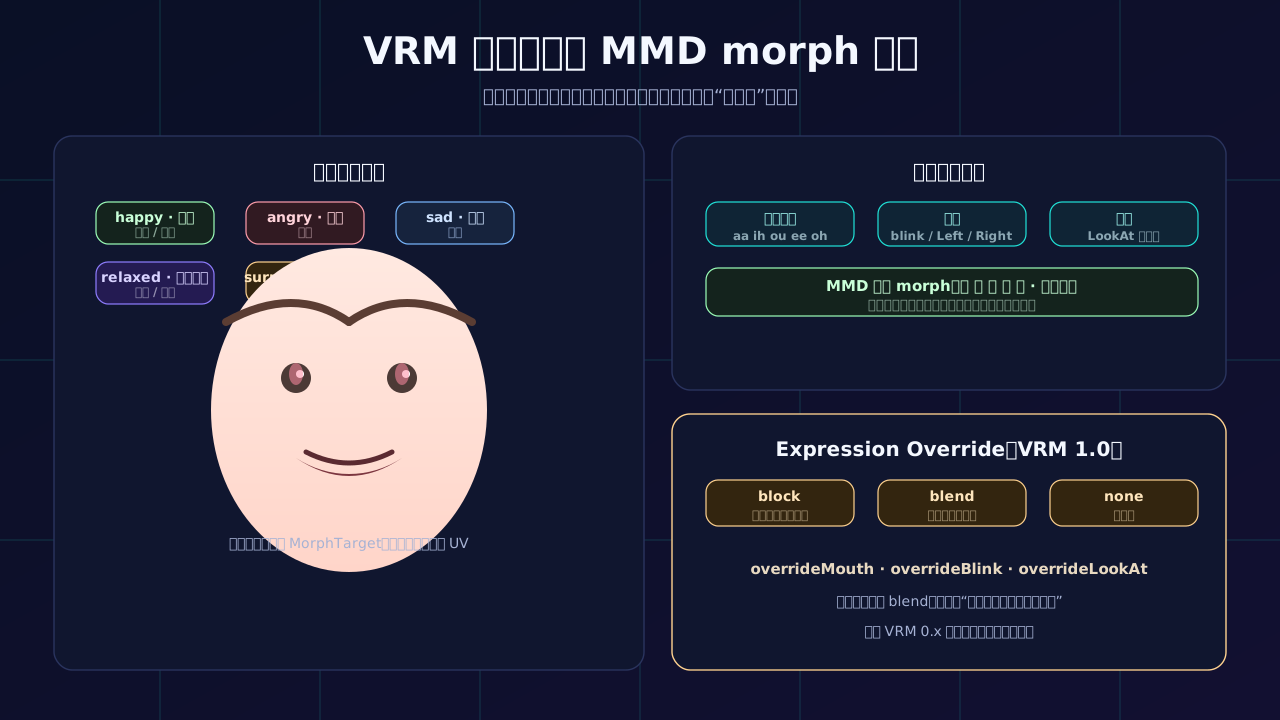
Bulk expression mapping script (optional)
If the PMX mesh is combined and you have many morphs, a short Python script can speed up mapping. This example is for VRM 0.x BlendShape groups:
import bpy

# Run with the mesh selected.
# Maps common MMD morph names to VRM 0.x BlendShape names.

Proxy = {
    "blink": "まばたき",
    "a": "あ",
    "i": "い",
    "u": "う",
    "e": "え",
    "o": "お",
    "joy": "笑い",
    "angry": "怒り",
    "sorrow": "困る",
}

for name, morph_name in Proxy.items():
    bpy.ops.vrm.add_vrm0_blend_shape_group(
        armature_object_name=bpy.context.active_object.name,
        name=name
    )
# Bind the morph in the VRM Add-on UI or extend the script here.happy / sad / relaxed and add surprised. MorphTarget weights are 0-1 in VRM 1.0, not 0-100 as in VRM 0.x.Step 5: Configure LookAt
LookAt makes the character's eyes follow a target. This matters on the desktop because AniMate can make a character look toward the mouse cursor naturally.
| Mode | Implementation | Best for |
|---|---|---|
| Bone | Rotates leftEye and rightEye bones | Models with separate eye bones |
| Expression | Drives lookUp / lookDown / lookLeft / lookRight | Texture-based eyes, common in MMD models |
左目 and 右目 in Blender. If separate eye bones exist, use Bone mode. If the eyes are part of the face mesh and rendered from a texture, use Expression mode. Most MMD models are the latter.LookAt space and offset
LookAt uses a LookAt Space parented to the head bone. offsetFromHeadBone defines the eye origin, usually between the eyes:
LookAt Space
|-- Parent: head bone (moves with the head)
|-- Origin offset: offsetFromHeadBone (e.g. [0, 0.06, 0])
+-- Rotation: inverse of the head bone's static model-space rotation
RangeMap: control how far the eyes turn
| RangeMap property | Meaning |
|---|---|
rangeMapHorizontalInner | Inward horizontal rotation toward the nose |
rangeMapHorizontalOuter | Outward horizontal rotation toward the ears |
rangeMapVerticalDown | Downward vertical rotation |
rangeMapVerticalUp | Upward vertical rotation |
Each RangeMap has inputMaxValue and outputScale. A smaller inputMaxValue makes the eyes turn more for the same target angle; outputScale is a bone rotation in degrees for Bone mode or an expression weight in 0-1 for Expression mode.
boneRotation = min(|angle|, inputMaxValue) / inputMaxValue x outputScaleinputMaxValue from 90 to 45 or increase outputScale. If they move too much, do the opposite.Step 6: Convert materials to MToon
PMX and VRM use different material systems. VRM recommends MToon, the anime/cel shader defined by the VRMC_materials_mtoon extension. MToon extends Lambert-style lighting with two-tone lit/shade colors, adjustable toon boundaries, rim light, and outline rendering so anime characters keep their hand-drawn look.
- Select the model mesh.
- Open Material Properties and process each material one by one.
- Convert the shader from the MMD material to MToon.
Alpha mode and transparency
| Property | Meaning | Suggestion |
|---|---|---|
| Alpha Mode | OPAQUE, MASK, or BLEND | Skin: OPAQUE; hair edges: MASK; lace: BLEND |
| transparentWithZWrite | Writes depth while rendering BLEND | Enable when semi-transparent objects need sorting |
| renderQueueOffsetNumber | Render queue offset for BLEND | Fixes occlusion between transparent objects |
Render queue order: OPAQUE > MASK > BLEND + ZWrite > BLEND.
Lit color and shade color
| Property | Meaning | Suggestion |
|---|---|---|
Lit Color (baseColorFactor) | Lit-side color plus texture | Use the original PMX base texture |
Shade Color (shadeColorFactor) | Shadow-side color plus texture | Use the original texture or a darker variant instead of pure black |
Traditional Lambert models turn black on the shadow side. MToon lets you specify a colored shadow tone, which is the key to a cel look.
Toon boundary controls
| Property | Default | Meaning |
|---|---|---|
| shadingToonyFactor | 0.9 | Sharpness of the light/shadow boundary; closer to 1 is a hard cel edge, closer to 0 is a soft gradient |
| shadingShiftFactor | 0.0 | Shifts the boundary position; positive expands the lit area |
| shadingShiftTexture | — | R channel controls boundary position per region |
| shadingShiftTexture.scale | 1.0 | How strongly the texture affects the boundary |
shading = dot(N, L) + shadingShiftFactor + textureContribution x scale
shading = linearstep(-1.0 + shadingToonyFactor, 1.0 - shadingToonyFactor, shading)
color = lerp(shadeColor, litColor, shading) x lightColor
For most anime models, set shadingToonyFactor between 0.8 and 1.0.
Rim lighting
| Component | Property | Meaning |
|---|---|---|
| MatCap | matcapFactor + matcapTexture | Samples a texture with view-space normals for fixed highlights |
| Parametric Rim | parametricRimColorFactor, parametricRimFresnelPowerFactor (default 5.0), parametricRimLiftFactor (default 0.0) | Procedural Fresnel-based rim light |
| Rim Mask | rimMultiplyTexture | Masks where rim light appears |
| Lighting Mix | rimLightingMixFactor (default 1.0) | 0 ignores scene light; 1 is fully lit |
rimShape = pow(saturate(1.0 - dot(N, V) + rimLiftFactor), fresnelPowerFactor)
rim = rimShape x parametricRimColorFactor
For hair, add a parametric rim with a light blue or purple tint and a Fresnel power around 3-5 for a soft backlit edge.
Outline
| Property | Meaning |
|---|---|
outlineWidthMode | none, worldCoordinates, or screenCoordinates |
outlineWidthFactor | Outline width; world mode is meters, screen mode is a screen-height ratio |
outlineWidthMultiplyTexture | G channel masks width per region |
outlineColorFactor | Outline color |
outlineLightingMixFactor | 0 is a flat outline; 1 multiplies outline color by surface lighting |
MToon draws outlines in a separate pass with front-face culling: vertices are pushed along normals and the back faces are drawn. The outline always uses front-face culling regardless of doubleSided.
shadingToonyFactor for MMD toon looks; note that MToon ignores vertex colors, so compensate with textures or material settings.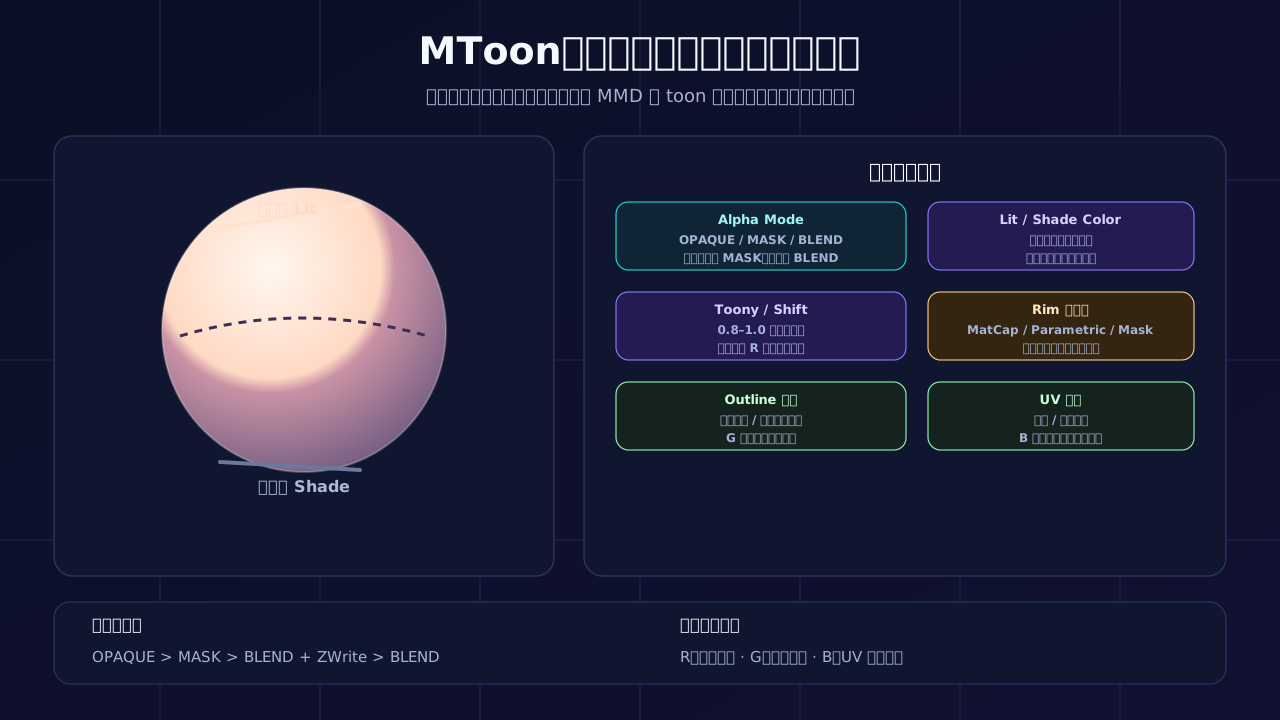
UV animation
| Property | Default | Meaning |
|---|---|---|
uvAnimationScrollXSpeedFactor | 0.0 | UV scroll speed on X in UV units per second |
uvAnimationScrollYSpeedFactor | 0.0 | UV scroll speed on Y |
uvAnimationRotationSpeedFactor | 0.0 | UV rotation speed in radians per second around 0.5, 0.5 |
uvAnimationMaskTexture | — | B channel animation mask |
A typical use is scrolling eyes or screen textures for a blinking display effect. The transform order is rotation around the UV center, then translation.
Texture channel packing
| Channel | Texture |
|---|---|
| R | shadingShiftTexture |
| G | outlineWidthMultiplyTexture |
| B | uvAnimationMaskTexture |
shadingToonyFactor = 0.9, then fine-tune.Step 7: Configure Spring Bone physics
VRM uses Spring Bone to simulate hair, clothing, accessories, and tails. PMX models often contain MMD physics data, but it must be rebuilt as VRM Spring Chains.
| Area | Example |
|---|---|
| Hair | Hair strand bone chains |
| Chest | Chest physics when applicable |
| Clothing | Skirts, capes, ribbons, and long sleeves |
| Accessories | Ribbons, tails, and floating props |
Spring Chain structure
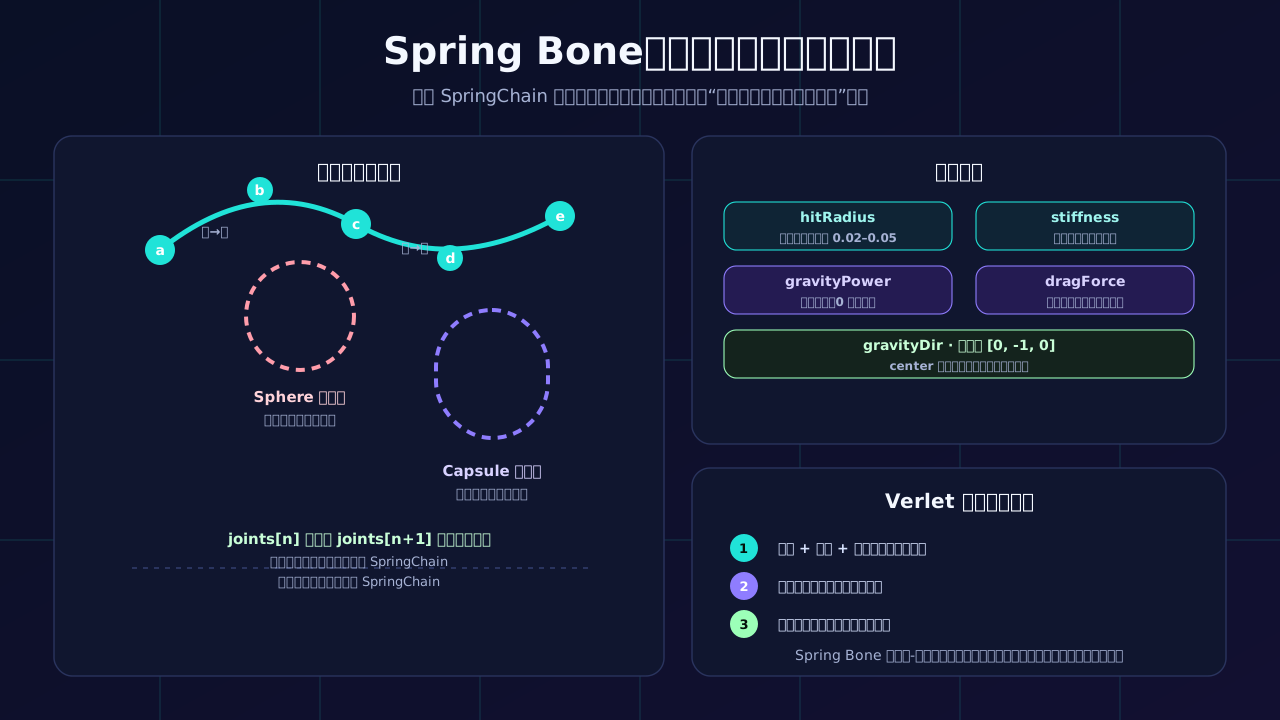
VRM Spring Bone organizes physics into SpringChains, each containing ordered joints. For a chain a-b-c-d, the runtime creates three head-tail pairs:
head (rotation)   tail (position + collision)
   a    ->      b
   b    ->      c
c -> d- The head node rotation is computed from the tail node displacement.
- The last joint only acts as a tail; its own parameters are ignored.
- To make the final segment swing, add an empty bone at the end.
joints[n] must be a parent or ancestor of joints[n+1]; one joint cannot belong to multiple SpringChains; branch chains must be separate SpringChains because execution order is not defined.Spring Bone joint parameters
| Parameter | Type | Meaning | Tuning |
|---|---|---|---|
hitRadius | float (meters) | Joint collision radius | Usually a small fraction of bone length, e.g. 0.02-0.05 |
stiffness | float (>=0) | Force pulling back to the rest pose | Low feels soft; high feels stiff |
gravityPower | float | Gravity applied each frame | High droops more; 0 disables gravity |
gravityDir | float[3] | Gravity direction | Usually [0, -1, 0] |
dragForce | float (0-1) | Damping / inertia decay | Low keeps swinging; high stops quickly |
The Verlet integration algorithm
Spring Bone runs three steps per frame:
Step 1: inertia
inertia = (currentTail - prevTail) x (1.0 - dragForce)
spring = deltaTime x parentWorldRotation x initialLocalRotation x boneAxis x stiffness
gravity = deltaTime x gravityDir x gravityPower
nextTail = currentTail + inertia + spring + gravity
nextTail = worldPosition + (nextTail - worldPosition).normalized x boneLength

Step 2: collision
for each collider assigned to the current SpringChain:
  if the distance to the joint tail is below zero, push the tail out
  and re-constrain bone length.

Step 3: apply rotation
prevTail = currentTail
currentTail = nextTail
to = (nextTail x inverse(parentWorldMatrix x initialLocalMatrix)).normalized
node.rotation = initialLocalRotation x fromToQuaternion(boneAxis, to)Colliders
| Collider type | Parameters | Use |
|---|---|---|
| Sphere | offset, radius | Head, chest, hands |
| Capsule | offset, radius, tail | Torso, thighs, arms |
Sphere collision:
distance = |nextTail - colliderOffset| - colliderRadius - jointRadius
  if distance < 0:
    pushDirection = (nextTail - colliderOffset).normalized
    nextTail += pushDirection x |distance|

Capsule collision:
project the joint position onto the capsule axis, then solve as a sphere.Center Space
Spring Bone evaluates in world space by default. VRM 1.0 supports a center node as a reference space: inertia is evaluated in center space while gravity stays in world space. If hair swings too wildly when a character moves, set center to the head bone so hair responds mostly to head motion.
Add Spring Bone in Blender
- Select the Armature.
- Open the Spring Bone area in the VRM panel.
- Add a Spring Bone Group, which becomes one SpringChain.
- Set Root Bones for the chain.
- Tune
stiffness,gravityPower, anddragForce. - Optional: add a Collider Group with the collision bones and shapes.
Add Spring Bone in Unity (advanced)
If you want more precise physics, finish the base conversion in Blender, import the VRM into Unity, and configure Spring Bone with UniVRM. UniVRM's visual collider editor is easier for fine tuning.
| Parameter | Unity component | Meaning |
|---|---|---|
stiffness | VRM10SpringBoneJoint.m_stiffnessForce | Stiffness |
dragForce | VRM10SpringBoneJoint.m_dragForce | Damping |
gravityPower | VRM10SpringBoneJoint.m_gravityPower | Gravity strength |
hitRadius | VRM10SpringBoneJoint.m_hitRadius | Collision radius |
| Collider | VRM10SpringBoneCollider | Sphere / Capsule collider |
Unity users can also try VrmSpringBoneTool, which simplifies Spring Bone setup and supports migration from VRM 0.x to 1.0.
Step 8: Fill in metadata and export VRM
Open the Meta area in the VRM panel and fill in the model information (VRMC_vrm.meta):
| Field | Meaning | Example |
|---|---|---|
| Name / Title | Model name | My School Uniform Avatar |
| Author | Author name | Your name or the model author |
| Version | Version number | 1.0 |
| Description | Model description | Converted from MMD PMX, optimized for VRM 1.0 desktop companion use |
| License | Usage license | Choose after reading the model readme |
| Avatar Permission | Allow use as another person's avatar | Only allowed / allowed / disallowed |
| Allow Excessively Violent Usage | Allow violent scenes | Allowed / disallowed |
| Allow Excessively Sexual Usage | Allow sexual scenes | Allowed / disallowed |
| Commercial Usage | Commercial license | Allowed / disallowed |
| Third Party Licenses | Third-party license notes | Attach the original model author's terms |
VRM license flags
| License | Meaning |
|---|---|
| Redistribution | Allows re-distribution |
| Modification | Allows modification |
| Credit | Requires attribution |
Pre-export checks
- Confirm the model is in T-Pose with arms extended and palms down. VRM Humanoid uses T-Pose as its initial pose; another pose can cause severe animation misalignment after import.
- Choose the export version: VRM 1.0 for desktop companions and new platforms, VRM 0.x for older compatibility.
- Run File → Export → VRM (.vrm).
- Choose an export path, review the export settings, and finish.
Final step: import the converted VRM into AniMate
Exporting the `.vrm` does not mean the character is finished. Run this quick checklist before importing into AniMate:
- Skeleton: all required Humanoid bones are mapped and the arms, legs, and head have no automatic mapping gaps.
- Expressions: blink, lip sync, and emotion expressions exist, and VRM 1.0 Override is set to blend where needed.
- Materials: transparent materials are not black, and the MToon boundary looks intentional.
- Physics: hair and skirts do not clip visibly, and colliders cover the head and torso.
- License: the Meta fields match the original readme.
In AniMate, open the Workshop by right-clicking the desktop character, choose Add Character, and select your exported `.vrm`. After the model loads, adjust size, position, and mouse interaction, then use the Workshop to add motions, dances, and stages. AniMate imports VRM 0.x and VRM 1.0 directly and keeps characters, motions, dances, and music-reactive assets in one library.
Related reading
| Topic | Page |
|---|---|
| What is a VRM desktop companion? | VRM desktop companion |
| Already have a `.vrm` file? | VRM import guide |
| Where do I find models? | Free VRM model directory, VRM model sources |
| Want the character to dance? | AniMate Workshop, Dance and stage guide |
| Want to make a VRM from scratch? | Create a VRM model with AI, Desktop pet maker guide |
| Desktop pet software recommendations? | Best desktop pet software |
Frequently asked questions
Can AniMate import PMX files directly?
AniMate is designed around VRM desktop companion files, so a `.vrm` is the most reliable choice. Convert PMX with Blender plus the VRM Add-on or Unity plus UniVRM before import.
Do I need 3D software experience to convert PMX to VRM?
No. Blender plus the VRM Add-on is the gentler route: install the add-on, import the PMX, create the VRM Model, then work through bones, expressions, materials, and physics in the panels. Most steps do not require scripting.
Should I export VRM 0.x or VRM 1.0?
Choose VRM 1.0 for new desktop companion use because expression names are more consistent, Expression Override handles conflicts, and Spring Bone rules are more complete. Use VRM 0.x only for older platforms that require it.
Why do hair and skirt physics look worse after conversion?
VRM Spring Bone is a particle-spring system, not rigid-body physics. Check each SpringChain parent relationship, then tune hitRadius, stiffness, gravityPower, and dragForce, and add colliders for the head and torso.
Can I convert and use someone else's MMD model commercially?
Read the model readme first. Most MMD models prohibit commercial use and redistribution, and modification, streaming, or commercial use must be confirmed separately with the author's license.
Put your MMD character on the desktop
Try AniMate with the built-in models first, then import your converted VRM and manage characters, motions, and dances in the Workshop.